• Skip to main content
  • Skip to primary sidebar
  • HOME
  • SKIN CARE
  • HAIR CARE
  • HEALTH AND WELLNESS
  • CONTACT US

Sharvayoni

Unearth Nature's Magic - Your Path to Herbal Radiance and Wellnes

vitamin E oil

Coconut Oil Hair Conditioner: Natural Nourishment for Your Tresses

March 28, 2024 by sharvayonibeauty Leave a Comment

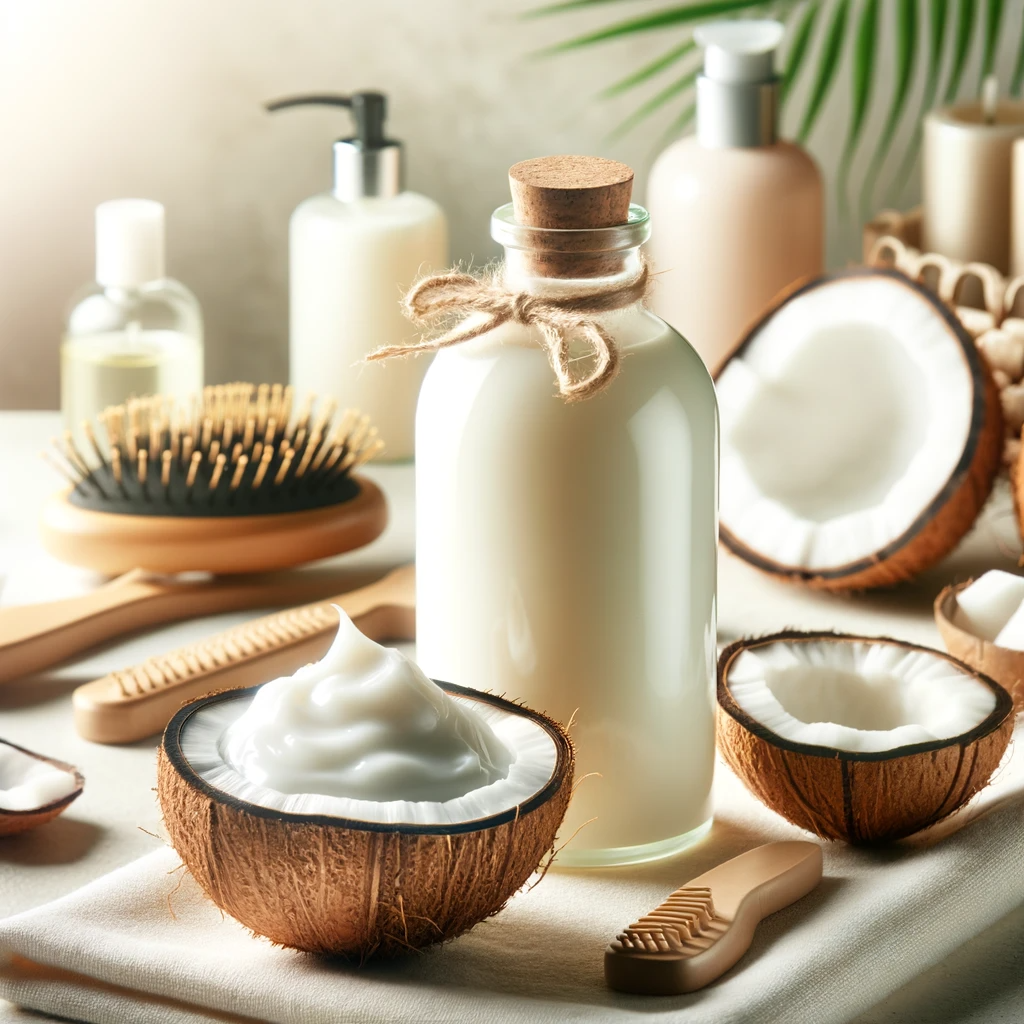
When it comes to achieving lustrous and healthy hair, nature often provides the best solutions. Coconut oil, in particular, is renowned for its moisturizing and nourishing properties, making it an ideal ingredient for a DIY hair conditioner. In this article, we’ll guide you through the process of creating a homemade coconut oil hair conditioner that will leave your locks looking and feeling rejuvenated. Say goodbye to commercial conditioners filled with chemicals and hello to the natural goodness of coconut oil.

Things Needed

Before we dive into the process of making your coconut oil hair conditioner, let’s gather all the essential items you’ll need:

  1. Coconut Oil: You’ll require 2/3 cup of coconut oil, known for its exceptional moisturizing properties.
  2. Jojoba Oil: 1 tablespoon of jojoba oil, which helps condition and soften your hair.
  3. Vitamin E Oil: 1 tablespoon of vitamin E oil, known for its nourishing and antioxidant benefits for hair and skin.
  4. Essential Oil: Choose 10 drops of your favorite essential oil to add a pleasant fragrance to your conditioner. Popular options include lavender, rosemary, or eucalyptus.

Now that you have all the ingredients ready, let’s proceed with the steps to prepare your homemade coconut oil hair conditioner.

Steps to Prepare

Follow these simple steps to create your own nourishing coconut oil hair conditioner:

Step 1: Ingredient Combination

In a mixing bowl, combine the 2/3 cup of coconut oil, 1 tablespoon of jojoba oil, 1 tablespoon of vitamin E oil, and your chosen 10 drops of essential oil.

Step 2: Mixing

Mix the ingredients together thoroughly using a hand mixer. Continue mixing until you achieve a creamy and smooth consistency. This will ensure that all the oils are well combined.

Step 3: Application

After shampooing your hair, apply 1-2 teaspoons of the coconut oil conditioner to your hair. Make sure to smooth it through your hair evenly, focusing on the ends where hair tends to be drier.

Step 4: Rinse and Pat Dry

Allow the conditioner to sit on your hair for a few minutes to maximize its effects. Then, rinse it out thoroughly with water. Gently pat your hair dry with a clean towel.

Note: If you use hair dyes, be aware that coconut oil may fade the color, especially in the case of red hair tints. Other hair tints or dyes may not be affected.

Benefits

Using a homemade coconut oil hair conditioner offers several benefits for your hair and overall hair care routine:

1. Deep Moisturization

Coconut oil is an excellent natural moisturizer, helping to hydrate and nourish your hair from root to tip. It’s particularly beneficial for dry and damaged hair, leaving it soft and manageable.

2. Jojoba Oil Benefits

Jojoba oil mimics the natural oils produced by the scalp, making it a great choice for conditioning and restoring the hair’s natural balance.

3. Vitamin E Nourishment

Vitamin E oil provides essential nutrients and antioxidants to your hair, promoting overall hair health and shine.

4. Customizable Fragrance

By adding your favorite essential oil, you can customize the scent of your conditioner, leaving your hair smelling delightful.

5. Natural Alternative

Homemade hair conditioner allows you to avoid the harsh chemicals often found in commercial products, making it a gentler and more natural choice for your hair care routine.

Conclusion

Elevate your hair care routine with a homemade coconut oil hair conditioner that provides deep moisturization, nourishment, and a delightful fragrance, all without the harsh chemicals found in commercial products. By following the simple steps outlined in this article, you can enjoy the natural benefits of coconut oil and other nourishing ingredients while keeping your hair soft, manageable, and healthy. Say goodbye to dry and damaged hair, and say hello to the rejuvenating power of nature. Make this DIY conditioner a part of your hair care regimen and enjoy the transformation of your locks, one application at a time.

Filed Under: Hair Care Tagged With: beauty tips, Chemical-Free Hair Care, coconut oil, customizable scent, DIY Hair Care, essential oils, hair care, hair conditioner, Hair Moisturization, homemade conditioner, Jojoba oil, natural beauty, vitamin E oil

Embrace Your Skin’s Story: A Natural Recipe to Fade Scars and Fine Lines

June 8, 2023 by sharvayonibeauty Leave a Comment

Life is a beautiful journey filled with moments that leave their mark, quite literally, on our bodies. Whether it’s a scar from a childhood adventure or fine lines that trace the passage of time, these physical imprints tell a unique story. While it’s impossible to completely erase them, there are natural remedies that can help diminish their appearance and restore your skin’s vitality. In this article, we will explore a variation of an ancient recipe to address scars and fine lines, allowing you to embrace your skin’s story with confidence and grace.

Step 1: Gather the Ingredients

To begin this transformative skincare journey, you will need two key ingredients: olive oil and vitamin E oil. Olive oil, renowned for its nourishing properties, has been cherished for centuries as a beauty elixir. Its rich content of antioxidants and essential fatty acids promotes skin health, helping to restore its natural radiance. Vitamin E oil, on the other hand, is a potent antioxidant that aids in repairing damaged skin and reducing the appearance of scars and fine lines. By combining these two ingredients, you create a powerful concoction that can work wonders for your skin.

Step 2: Prepare the Mixture

In a clean bowl, combine 1/3 cup of olive oil with 5 drops of vitamin E oil. Stir the mixture gently to ensure the oils are thoroughly blended. This balanced blend of oils will provide your skin with the nourishment and hydration it needs to fade scars and fine lines over time.

Step 3: Apply the Mixture

Now that your magical elixir is ready, it’s time to apply it to your body. Take a generous amount of the mixture and gently massage it onto your skin, focusing on areas with scars or fine lines. Use circular motions to promote better absorption and to stimulate blood circulation, which can enhance the healing process.

Step 4: Embrace Consistency and Patience

As with any natural remedy, consistency and patience are key. Apply the mixture daily, preferably before bedtime, allowing your skin to soak up the goodness while you rest. Over time, the nourishing properties of olive oil and vitamin E oil will work together to fade scars and fine lines, revealing smoother, more even-toned skin.

It’s important to note that individual results may vary, and it may take several weeks or even months to see noticeable improvements. Each person’s skin is unique, and factors such as the severity of the scars or fine lines, skin type, and overall skin health can influence the outcome. However, by embracing the process and maintaining a regular skincare routine, you are giving your skin the opportunity to rejuvenate and heal naturally.

While the application of this homemade remedy is safe for most individuals, it’s always wise to perform a patch test before applying it to larger areas of your body, especially if you have sensitive skin or known allergies. If any irritation or discomfort occurs, discontinue use immediately and consult a dermatologist.

In addition to this natural treatment, it’s essential to care for your skin holistically. Stay hydrated by drinking plenty of water, follow a balanced diet rich in vitamins and minerals, and protect your skin from harmful UV rays by using sunscreen daily. These lifestyle habits, coupled with the nourishing properties of the olive oil and vitamin E oil mixture, can contribute to healthier, more radiant skin.

Embrace your skin’s story, for each scar and fine line is a testament to the beauty of your journey. With the help of this ancient recipe variation, you can diminish their appearance and celebrate the unique tapestry that is your skin. Be patient, be consistent, and let your skin shine with renewed confidence.

Filed Under: Skin Care Tagged With: diminish fine lines, embrace skin's story, fade scars, homemade skincare, Natural remedy, olive oil, radiant skin, skin care, smoother skin, vitamin E oil

Primary Sidebar

Looking for something?

Connect with us online

  • Email
  • Facebook

Popular Posts!

Best Natural Remedies To Get Rid Of Dandruff

Enhancing Hair and Scalp Health with Olive Oil and Coconut

Hair pack of Coconut milk and Onion juice

Embrace Your Skin’s Story: A Natural Recipe to Fade Scars and Fine Lines

Battle Dandruff Naturally with Apple Juice: A Simple Hair Pack Solution

Categories

  • Hair Care
  • Health and Wellness
  • Skin Care

Tags

beauty benefits beauty tips Chemical-Free Hair Care coconut oil curd curry leaves dark circles DIY Hair Care egg exfoliation eye care glowing skin hair care Hair Care Routine hair care tips hair growth Hair health Hair Health Improvement hair loss Hair Nourishment Hair Strengthening health and wellness honey hydration lemon lemon juice milk natural beauty natural conditioner natural face mask Natural hair care Natural Hair Growth Natural Hair Remedies natural ingredients natural remedies Natural remedy natural skincare olive oil radiant complexion radiant skin scalp health Scalp Nourishment skin care skincare skincare routine

© 2026 · Sharvayoni · Privacy Policy · Disclaimer